Showing posts with label bedroom. Show all posts

Beautiful Inspiration for Blue Rooms...


For this weeks mid week blues I wanted to brighten up your day with some beautiful blue rooms, if you want to see more all the pictures where found at House of Turquoise. Today, here in the southeast its horrible out. A nor'easter and its raining AGAIN! So these pictures really lightened the mood and made me crave summer. Hope they do the same for you. Don't work too hard and have a great day :-)


___________________________________________________________________

The Blue Lagoon
Ingredients:
- 2 oz vodka
- 1/2 oz blue curacao
- 4 oz lemonade
Garnish:
- cherry
- orange slice

Mix all ingredients in a cocktail shaker with ice. Pour into a tall glass and garnish with cherry and orange slice.

Read More

Stenciled Bed Skirts

I have always really disliked bed skirts, but seeing the bottom and underneath of the bed is not acceptable either. This is great especially if you have kids, because really who wants to see the mess under their beds? This is not only a cute idea but cheap. You can use a bed skirt that you already have or a cheap one you find. Its an easy dress up for a bedroom that will only take an hour or 2 all together to accomplish.
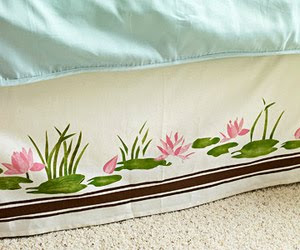


Items Needed:
Bed skirt
Stencil of your choice
Fabric paint
Brush or sponge
Measuring tape
Ribbon if you choose


Procedure:
1. Lay the bed skirt out flat on the floor with cardboard under the sections you will be painting.
2. Place the stencil on the desired place, make sure if you are going to stitch ribbon onto the bottom you leave enough space.
3. Now with your sponge or paint brush stencil out the design
4. Wipe off excess paint from the outline, keep the stencil as clean as possible.
5. You can either eye ball it if your good, or measure out where the stencil that you already did is placed from the top and bottom and the distance you want them to be apart.
6. Follow steps 3-5 until the whole bed skirt is done.
7. Let dry over night
8. If you are applying ribbon to the bottom, using a sewing machine stitch the top and bottom of the ribbon to the skirt.
9. Your all done!

(Idea and pictures from Better Homes and Gardens)

Read More

Queen of Hearts Bedroom...

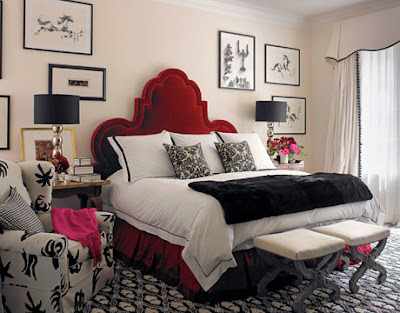
(picture from House Beautiful)

Happy Monday everyone or now Tuesday! So Valentines Day is Sunday, I figured I would do a romantic week. Everything will focus around Valentines Day, Anniversaries, and just romance in general. For Decoupage Monday here is romantic beauty of a bedroom that will make you the Queen of men's hearts. The romantic ambiance in this bedroom, no matter what day it is will erupt the passion between you and your partner.

This room is also a great DIY project! Between the chair and the paintings it will definitely keep you busy for a few days. The chair if you look back in my DIY posts you will find one for the printed burlap chair. This would pretty much be the same situation. Get a tan slip cover and before putting it on imprint different types of palm trees or anything you would like onto it, let it dry and then place it on the chair. Doing it while its on the chair will cause a distorted image and will be very difficult to accomplish.

For the images in the frames you can freehand or if you don't feel that ambitious, you can buy some from a stock photo site and print it out or buy a book full of black and white art and frame some of the pictures in it (I love doing this!). For silhouetted pictures (which I think would look amazing in this room) trace an image onto black paper and then cut it out and mount on a white piece of paper with glue or tape.


Some of the furniture in is antique (end tables, and benches) for a cheaper way check out flea markets and antique stores for pieces to fit! OK so here's the canvas for the room, I also threw in some decor items that would work well with it.


1- Red velvet headboard: Bedroom Furniture.com
2 - Bed sheets: CSN Stores
3 - Faux fur throw: Overstock
4- Rug: Rosenberry Rooms
5 - End tables: Target
6 - Lamps: Sears
7 - Lamp shades: Lamps Plus
8- Some decor that would go with it from "The Shop":
Pedestal Candle holders
Floral Lantern
Tabletop Hanging Vase

Read More

DIY: Ever Changing Headboard!

(pic from Better Homes and Gardens)

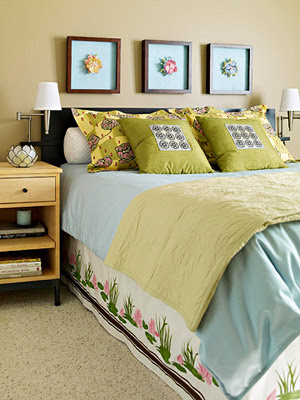
Hi everyone, I know we are all looking forward to the weekend, so here is a good quick project that will change your whole bedroom decor.

When my husband and I moved into our current home the bedroom was pretty tiny and had windows everywhere, including on the only wall that we could put the bed. We needed a headboard because slamming our heads into the window sill every night just wasn't an option. So we took a piece of plywood covered it with a flat sheet (since we don't use them) and hung the raised panels that my mother made for us as a backboard in our old home and hung them on the plywood, voila! Perfect headboard. But it is what it is, a Moroccan themed headboard that can not be changed out. And with my creative mind I like variety. I came across this cute and simple idea for a head board that you can change to go with the your linens, at
Better Homes and Gardens.

All you need is a staple gun, fabric, and a cheap artist canvas. And its as simple as "pulling fabric across the frame and securing with a staple gun." Its cheap and elegant. Now if you want to be more creative, if you don't use your flat sheets like me, use that and stencils (or freehand) to design your own decorative fabrics.


Alright and there you have it! Check out the next entry for our monthly contest.

Read More